THE SIX STAGES OF CLAY
It is important to know and UNDERSTAND the stages of clay so that your projects do not break, dry out or become unsalvageable. These stages will pertain to every project we do in this class.
The Six Stages of Clay
Slip: Clay mixed with water, has a chunky texture. It is used as the “glue” when hand building.(Show students where the slip is located in the classroom and what it looks like)
Plastic: Workable clay. Strong enough to hold its shape and flexible enough to bend without breaking.
(Show where you get new clay in the classroom-buckets in the back and that it should be pretty damp and pliable).
Leather Hard: Half way dry, good for carving and building with slabs. Still has some flexibility but will crack when bent.
Bone Dry: Air dry and ready for the kiln. Clay turns white colored. This stage has no flexibility and is VERY fragile.
Bisque: First fired, has been fired in the kiln once and is “Hard Rock”.(show example of a first fired piece)
Glazeware: Second firing, after you have painted on your glaze it will be fired again fire and have a “shiny coat”.(show example of glazed fired- finished piece).
* Show video Below
The Six Stages of Clay
- Slip
- Plastic
- Leather Hard
- Bone Dry
- Bisque
- Glazeware
Slip: Clay mixed with water, has a chunky texture. It is used as the “glue” when hand building.(Show students where the slip is located in the classroom and what it looks like)
Plastic: Workable clay. Strong enough to hold its shape and flexible enough to bend without breaking.
(Show where you get new clay in the classroom-buckets in the back and that it should be pretty damp and pliable).
Leather Hard: Half way dry, good for carving and building with slabs. Still has some flexibility but will crack when bent.
Bone Dry: Air dry and ready for the kiln. Clay turns white colored. This stage has no flexibility and is VERY fragile.
Bisque: First fired, has been fired in the kiln once and is “Hard Rock”.(show example of a first fired piece)
Glazeware: Second firing, after you have painted on your glaze it will be fired again fire and have a “shiny coat”.(show example of glazed fired- finished piece).
* Show video Below
THE FOUR S's
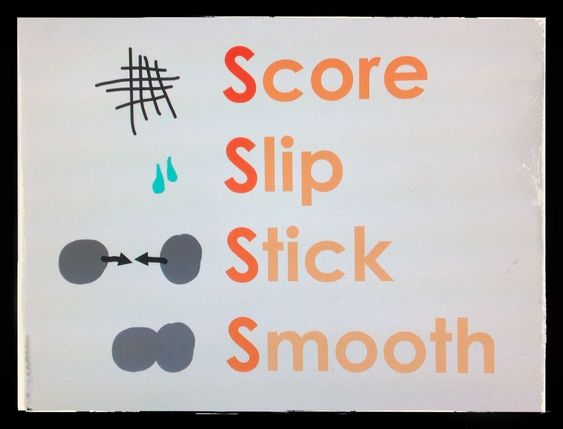
The Four S’s
Score, Slip, Stick, Smooth
The four S’s are what holds things together. Missing any of these stages will lead to your pieces breaking off and not sticking together.
First S: Score
Scoring to Join Pieces Together
Scoring is a key part of attaching one piece of clay to another. A common task is to attach a handle to a mug or jar, attaching a decoration to a piece, or mating coils together. If they aren't firmly united together, they can fall apart as they dry or are fired in the kiln. You can form the pieces separately and then use the scoring and slipping technique to attach them while they are set in shape yet still wet enough to be put together.
You will need to score your main object and what you are attaching to it. Then use the scoring tool (pin tool show hold up one) to make crisscross marks on each of the objects.Once both objects are scored, the slip is applied to one or both of the scored areas and the objects are pressed together.
Score: to scratch hatch marks on both sides of the clay before joining them together. The process is often called "score and slip."
Second S: Slip
Slip is used as a glue to join pieces of dry clay that are broken and to attach parts such as handles and knobs that have to be leather hard before being joined. It is a ruff, thick mixture of water and clay, usually prepared in small quantities and applied with a paint brush to pieces of clay that have to be joined, they should be scored first. It is used when joining parts that are broken or have to be attached separately, such as handles, spouts, etc.
- If you score the pieces together and don’t add slip they won’t hold.
- If you only slip the pieces and don’t score them they won’t hold.
- You must SCORE and SLIP to get all pieces to stick
Slip: is a mixture of clay and water that has a mayonnaise like texture used as glue to join the clay together.
Third S: Stick
Once you have scored and slipped your pieces together on each end you will stick them together. It is important when combining the pieces that have been scored and slipped that you press firmly and make sure they grip together.
Stick: Combining two pieces of clay together after scoring and slipping.
Fourth S: Smooth
After you have scored, slipped and “sticked” your pieces together the final step in smoothing it out. You can smooth out you clay in many different ways. The most effective for larger pieces is using a plastic or metal rib (show rib and where to get it). For smaller pieces you can use different size ribbon tools (show tools and where to get them), you can use your finger, or someone in class who has long acrylic nails! (Go figure).
Smooth: Smoothing or rubbing together the joints in the clay to create one piece.
* Show video Below
